3.2 Object Picking
Another important form of interaction in 3D graphics is object picking or selection. For example, in an RTS game, we use the mouse to select the units we want to control.
Ray casting
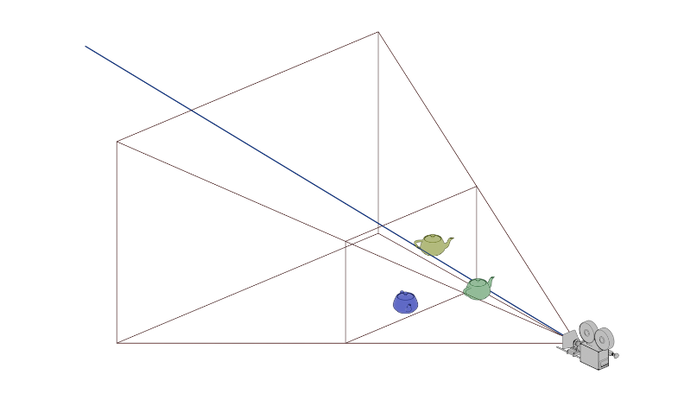
Launch Playground - 3_02_1_picking_ray_castingThere are two common ways to implement picking. We will look at both in this tutorial. The first method is called ray casting, and its principle is straightforward. Recall that by applying a projection matrix, we can project a 3D point onto the screen plane. Ray casting simply reverses this process: given a 2D position on the screen plane (our mouse cursor position), we obtain a ray by using the projection matrix. This ray will overlap the 2D point if projected. We then use that ray to test against objects that might intersect with it. If an intersection occurs, we select the object of interest.
Precise ray-object intersection can be challenging to compute if the object has a complex shape, such as a teapot. Usually, we use an overlapping proxy geometry for the calculation. For example, a bounding box or a bounding sphere. Typically, the ray intersection can be efficiently checked against the proxy geometry using a simple formula. In this tutorial, we will be using proxy spheres.
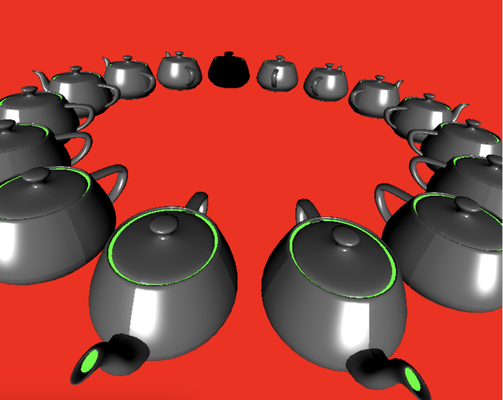
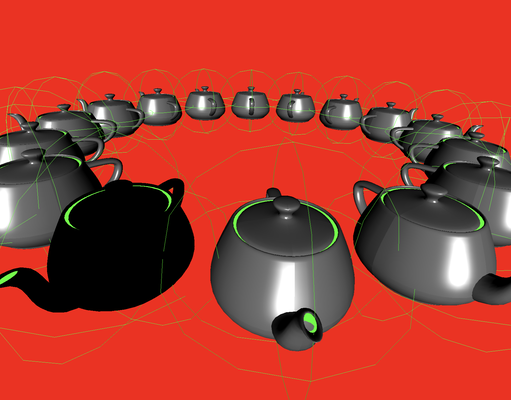
In this demo, we will render 16 teapots forming a ring using the instancing technique. Each teapot is enclosed by a proxy sphere. We render the proxy sphere for visualization purposes. Ray casting is primarily calculated by the CPU code in JavaScript, so I will omit most of the explanation regarding rendering. Please refer to the sample code for details. Here, I want to focus on the scene setup.
The choice of spheres as the proxy geometry is mainly due to the ease of calculating sphere-ray intersections compared to other proxy geometries. However, using spheres is not the most accurate option.
The first part involves constructing three rings to represent the proxy sphere, similar to what we created in the previous chapter. The three rings are perpendicular to each other because we want to use them to represent the silhouette of the proxy sphere.
const teapotCenter = glMatrix.vec4.fromValues(center[0], center[1], center[2], 1.0);

console.log("teapot center", teapotCenter);

this.ringPositionBuffer = [];

for (let i = 0; i < 16; ++i) {
    const angle = 2.0 * Math.PI * i / 16.0;
    const x = Math.cos(angle) * radius;
    const y = Math.sin(angle) * radius;

    this.ringPositionBuffer.push(x + center[0]);
    this.ringPositionBuffer.push(y + center[1]);
    this.ringPositionBuffer.push(0.0 + center[2]);
}

this.ringPositionBuffer = createGPUBuffer(device, new Float32Array(this.ringPositionBuffer), GPUBufferUsage.VERTEX);

this.ringPositionBuffer2 = [];
for (let i = 0; i < 16; ++i) {
    const angle = 2.0 * Math.PI * i / 16.0;
    const x = Math.cos(angle) * radius;
    const z = Math.sin(angle) * radius;

    this.ringPositionBuffer2.push(x + center[0]);
    this.ringPositionBuffer2.push(0.0 + center[1]);
    this.ringPositionBuffer2.push(z + center[2]);
}

this.ringPositionBuffer2 = createGPUBuffer(device, new Float32Array(this.ringPositionBuffer2), GPUBufferUsage.VERTEX);


this.ringPositionBuffer3 = [];
for (let i = 0; i < 16; ++i) {
    const angle = 2.0 * Math.PI * i / 16.0;
    const y = Math.cos(angle) * radius;
    const z = Math.sin(angle) * radius;

    this.ringPositionBuffer3.push(0.0 + center[0]);
    this.ringPositionBuffer3.push(y + center[1]);
    this.ringPositionBuffer3.push(z + center[2]);
}
this.ringPositionBuffer3 = createGPUBuffer(device, new Float32Array(this.ringPositionBuffer3), GPUBufferUsage.VERTEX);
Here, we create three position buffers, each containing the vertices of a ring centered at the teapot's center. Next, we will set up individual rotation and translation for each teapot instance:
for (let i = 0; i < this.instanceCount; ++i) {

    const angle = 2.0 * Math.PI * i / this.instanceCount;

    let translation = glMatrix.mat4.fromTranslation(glMatrix.mat4.create(),
        glMatrix.vec3.fromValues(Math.cos(angle) * circleRadius,
            Math.sin(angle) * circleRadius, 0));
    let rotation = glMatrix.mat4.fromRotation(glMatrix.mat4.create(), Math.PI * 0.5 + angle, glMatrix.vec3.fromValues(0.0, 0.0, 1.0));

    const modelViewMatrix = glMatrix.mat4.multiply(glMatrix.mat4.create(), translation, rotation);

    transformationMats.set(modelViewMatrix, i * 16);

    let modelViewMatrixInverse = glMatrix.mat4.invert(glMatrix.mat4.create(), modelViewMatrix);

    let normalMatrix = glMatrix.mat4.transpose(glMatrix.mat4.create(), modelViewMatrixInverse);

    normalMats.set(normalMatrix, i * 16);

    let center = glMatrix.vec4.transformMat4(glMatrix.vec3.create(), teapotCenter, modelViewMatrix);
    this.instanceCenters.push(glMatrix.vec3.fromValues(center[0], center[1], center[2]));

    console.log('center ', center)
}
For each teapot, we first apply a rotation and then move it to a position such that all instances form a ring. The modelViewMatrix is stored in an array, and similarly, the normal matrices are kept in another array. These arrays are passed into the shader program as:
@group(0) @binding(3)
var<uniform> teapotTransformationMat : array<mat4x4<f32>, 16>;
@group(0) @binding(4)
var<uniform> teapotNormalMat : array<mat4x4<f32>, 16>;
@vertex
fn vs_main(
    @builtin(instance_index) instanceIdx : u32,
    @location(0) inPos: vec3<f32>,
    @location(1) inNormal: vec3<f32>
    //,@location(2) transformation: mat4x4<f32>
) -> VertexOutput {
    var out: VertexOutput;
    out.viewDir = normalize((normalMatrix * vec4<f32>(-viewDirection, 0.0)).xyz);
    out.lightDir = normalize((normalMatrix * vec4<f32>(-lightDirection, 0.0)).xyz);
    out.normal = normalize(normalMatrix * teapotNormalMat[instanceIdx] * vec4<f32>(inNormal, 0.0)).xyz;

    out.clip_position = projection * modelView * teapotTransformationMat[instanceIdx] * vec4<f32>(inPos, 1.0);

    if (selected == instanceIdx) {
        out.normal = vec3<f32>(0.0, 0.0, 0.0);
    }
    return out;
}
The vertex shader’s main function includes an input @builtin(instance_index) instanceIdx : u32. Similar to the vertex_index we have seen before, this builtin provides the instance ID. We use this index to retrieve the corresponding transformation and normal matrices for each instance.
Notice that we also save the transformed teapot centers into an array; they are important for the ray-sphere intersection test.
Now let’s examine the picking functionality implemented in the mouse event handling functions. Since this demo also supports navigation via arcball, much of the implementation, such as the onmousedown function, is similar to what we covered in the previous chapter. Here, I’ll focus on the differences, particularly the picking logic in the mousemove event handler:
//selection mode
const currX = (x - originX) * 2.0 / width;
const currY = (originY - y) * 2.0 / height;
//https://gamedev.stackexchange.com/questions/17987/what-does-the-graphics-card-do-with-the-fourth-element-of-a-vector-as-the-final
//https://antongerdelan.net/opengl/raycasting.html
//https://gamedev.stackexchange.com/questions/153078/what-can-i-do-with-the-4th-component-of-gl-position
let projectionMatrixInverse = glMatrix.mat4.invert(glMatrix.mat4.create(), projectionMatrix);

let clipSpacePosition = glMatrix.vec4.fromValues(currX, currY, 0.0, 1.0);

let camSpacePosition = glMatrix.vec4.transformMat4(glMatrix.vec4.create(), clipSpacePosition, projectionMatrixInverse);

//clipSpacePosition[2] = -1;
camSpacePosition[3] = 0;

let dir = glMatrix.vec4.transformMat4(glMatrix.vec4.create(), camSpacePosition, modelViewMatrixInverse);

dir = glMatrix.vec3.normalize(glMatrix.vec3.create(), dir);
let found = false;
console.log("select", currX, currY, teapot.instanceCount);
for (let i = 0; i < teapot.instanceCount; ++i) {
    let center = teapot.instanceCenters[i];
    center = glMatrix.vec3.fromValues(center[0] - arcball.forwardVector[0],
        center[1] - arcball.forwardVector[1],
        center[2] - arcball.forwardVector[2]);

    const dot = glMatrix.vec3.dot(center, dir);
    const dis = glMatrix.vec3.length(glMatrix.vec3.subtract(glMatrix.vec3.create(), glMatrix.vec3.scale(glMatrix.vec3.create(), dir, dot), center));
    console.log("dis ", dis);
    if (dis < teapot.teapotRadius) {
        console.log('found teapot ', i, dis, teapot.teapotRadius);
        const selectionUniformBufferUpdate = createGPUBuffer(device, new Uint32Array([i]), GPUBufferUsage.COPY_SRC);
        commandEncoder = device.createCommandEncoder();
        commandEncoder.copyBufferToBuffer(selectionUniformBufferUpdate, 0,
            teapot.selectionUniformBuffer, 0, 4);
        device.queue.submit([commandEncoder.finish()]);
        requestAnimationFrame(render);
        console.log("update selection")
        found = true;
        break;
    }
}
if (!found) {
    const selectionUniformBufferUpdate = createGPUBuffer(device, new Uint32Array([17]), GPUBufferUsage.COPY_SRC);
    commandEncoder = device.createCommandEncoder();
    commandEncoder.copyBufferToBuffer(selectionUniformBufferUpdate, 0,
        teapot.selectionUniformBuffer, 0, 4);
    device.queue.submit([commandEncoder.finish()]);
    requestAnimationFrame(render);
}
This function includes a condition to check if the mouse is being dragged. If it is, we treat the input as an arcball navigation gesture and update the arcball accordingly. If the mouse is moving without any buttons pressed, we consider it a picking scenario.
const currX = (x - originX) * 2.0 / width;
const currY = (originY - y) * 2.0 / height;
//https://gamedev.stackexchange.com/questions/17987/what-does-the-graphics-card-do-with-the-fourth-element-of-a-vector-as-the-final
//https://antongerdelan.net/opengl/raycasting.html
//https://gamedev.stackexchange.com/questions/153078/what-can-i-do-with-the-4th-component-of-gl-position
let projectionMatrixInverse = glMatrix.mat4.invert(glMatrix.mat4.create(), projectionMatrix);

let clipSpacePosition = glMatrix.vec4.fromValues(currX, currY, 0.0, 1.0);

let camSpacePosition = glMatrix.vec4.transformMat4(glMatrix.vec4.create(), clipSpacePosition, projectionMatrixInverse);

//clipSpacePosition[2] = -1;
camSpacePosition[3] = 0;

let dir = glMatrix.vec4.transformMat4(glMatrix.vec4.create(), camSpacePosition, modelViewMatrixInverse);

dir = glMatrix.vec3.normalize(glMatrix.vec3.create(), dir);
The purpose of the above code is to convert the current mouse position on the canvas into a ray direction in world space. To understand this, it's important to be familiar with the coordinate transformations in the graphics pipeline. After applying the projection matrix, a 3D point is transformed from camera coordinates into clip space. The clip space position ranges from -1.0 to 1.0 for x, y, and z coordinates. Therefore, the calculations ensure that x and y are within this normalized range.
const currX = (x - originX) * 2.0 / width;
const currY = (originY - y) * 2.0 / height;
For the z-axis, since the screen position is 2D, we need to assign a z value to clipSpacePosition. Here, we use zero. For the w component, recall that in homogeneous coordinates, if the last component is 1.0, it represents a position; otherwise, it represents a direction. For now, let's treat it as a position. We then apply the inverse projection matrix to transform the clip space point into the camera coordinate system. In camera coordinates, the origin is at the camera. Therefore, the ray we cast from the camera through the mouse position into the scene is represented by the point's position minus the origin. We set the camera coordinates' w component to zero because it represents a direction rather than a position. Finally, we apply the inverse model-view matrix to this direction to get the direction in world space and normalize it.
for (let i = 0; i < teapot.instanceCount; ++i) {
    let center = teapot.instanceCenters[i];
    center = glMatrix.vec3.fromValues(center[0] - arcball.forwardVector[0],
        center[1] - arcball.forwardVector[1],
        center[2] - arcball.forwardVector[2]);

    const dot = glMatrix.vec3.dot(center, dir);
    const dis = glMatrix.vec3.length(glMatrix.vec3.subtract(glMatrix.vec3.create(), glMatrix.vec3.scale(glMatrix.vec3.create(), dir, dot), center));
    console.log("dis ", dis);
    if (dis < teapot.teapotRadius) {
        console.log('found teapot ', i, dis, teapot.teapotRadius);
        const selectionUniformBufferUpdate = createGPUBuffer(device, new Uint32Array([i]), GPUBufferUsage.COPY_SRC);
        commandEncoder = device.createCommandEncoder();
        commandEncoder.copyBufferToBuffer(selectionUniformBufferUpdate, 0,
            teapot.selectionUniformBuffer, 0, 4);
        device.queue.submit([commandEncoder.finish()]);
        requestAnimationFrame(render);
        console.log("update selection")
        found = true;
        break;
    }
}
Next, we loop through all teapots. For each teapot, we calculate the direction from its center to the camera position. We project this vector onto the ray vector and then scale the ray vector by the projected length. Finally, we subtract the teapot’s center vector from the scaled ray vector. The resulting vector, which is perpendicular to the ray vector, represents the shortest distance from the teapot’s center to the ray. If this distance is smaller than the radius of the teapot’s proxy sphere, we consider that the ray intersects the teapot.
In this case, we update the current selected teapot index in the uniform buffer. In the shader code, if an instance ID matches the current selection, the teapot is rendered in a different color.
If no selection is detected, we reset the previous selection by setting the current selection ID to 17. Since we only have 16 teapots, no ID will match 17 in the shader, causing all teapots to be rendered normally.
if (!found) {
    const selectionUniformBufferUpdate = createGPUBuffer(device, new Uint32Array([17]), GPUBufferUsage.COPY_SRC);
    commandEncoder = device.createCommandEncoder();
    commandEncoder.copyBufferToBuffer(selectionUniformBufferUpdate, 0,
        teapot.selectionUniformBuffer, 0, 4);
    device.queue.submit([commandEncoder.finish()]);
    requestAnimationFrame(render);
}
Lastly, let's look at how to encode a draw command for instanced rendering. The advantage of instanced rendering is that it allows us to efficiently duplicate the same geometry, which is ideal for rendering foliage in games or particles. In this example, rendering instanced objects is straightforward. We simply need to specify the total number of instances to render when encoding the draw command. As previously discussed, each instance has its own transformation matrices, which are retrieved from a uniform buffer based on the instanceIdx.
encode(encoder) {
    encoder.setPipeline(this.pipeline);
    encoder.setBindGroup(0, this.uniformBindGroup);
    encoder.setVertexBuffer(0, this.positionBuffer);
    encoder.setVertexBuffer(1, this.normalBuffer);
    encoder.setIndexBuffer(this.indexBuffer, 'uint16');
    encoder.drawIndexed(this.indexSize, this.instanceCount);
    encoder.setPipeline(this.ringPipeline);
    encoder.setBindGroup(0, this.ringUniformBindGroup);
    encoder.setVertexBuffer(0, this.ringPositionBuffer);
    encoder.draw(16, this.instanceCount);
    encoder.setVertexBuffer(0, this.ringPositionBuffer2);
    encoder.draw(16, this.instanceCount);
    encoder.setVertexBuffer(0, this.ringPositionBuffer3);
    encoder.draw(16, this.instanceCount);
}
Color coding
Launch Playground - 3_02_2_picking_color_codingRay casting is relatively simple to implement but has limitations in some scenarios. For example, proxy geometries often lack the detail of the actual objects, which can affect precision in picking. Additionally, the ray casting method we implemented does not account for occlusion; a distant and occluded object might still be picked if it is encountered first during intersection detection. Furthermore, in cases where objects have a single side, such as a plane with only a front face, the object should not be visible when facing away from the viewer if we cull its back face. However, ray picking would still select it. Lastly, with many objects, ray casting can become slow, especially when many objects are obscured or outside the view. This issue can be mitigated by using more efficient scene data structures like a kd-tree, which limits ray intersection tests to objects that are likely to intersect with the ray.
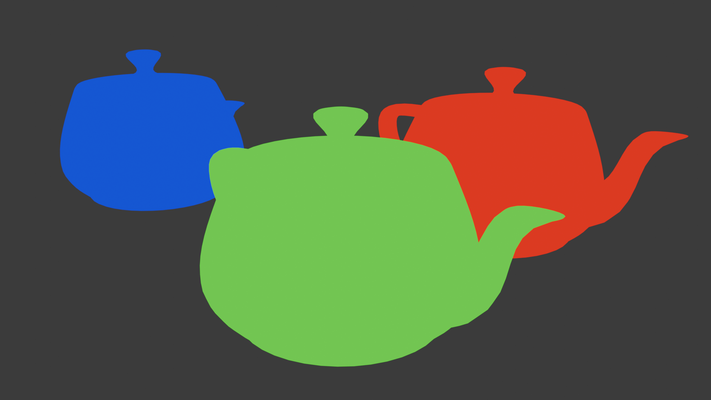
In this section, we will explore an alternative picking method called color coding, which addresses some of these issues. The principle of color coding is straightforward: we encode each object's ID as a unique color. With RGB colors, we can represent up to 2^24 objects, which is sufficient for most use cases. We render the scene using these unique colors and then read back the rendered image. During this step, it is important to avoid processes that could alter color values, such as blending or anti-aliasing. After rendering, we can retrieve object IDs from the colors by checking the color under the mouse cursor. Instead of reading the entire image, it is sufficient to sample a small area around the cursor. Additionally, rendering at a reduced resolution can enhance performance, as picking does not typically require pixel-level accuracy.
The benefits of color coding are clear: by rendering the scene with unique colors, only the frontmost and visible object is considered for selection. This method also avoids the need for proxy geometries, allowing for precise picking with the actual geometry. However, unlike ray casting, color coding requires coordination between shader code and JavaScript code.
Now, let’s look at the code:
@vertex
fn vs_main(
    @builtin(instance_index) instanceIdx : u32,
    @location(0) inPos: vec3<f32>,
    @location(1) color: vec4<u32>
) -> VertexOutput {
    var out: VertexOutput;
    out.clip_position = projection * modelView * teapotTransformationMat[instanceIdx] * vec4<f32>(inPos, 1.0);
    out.color = color.xyz;
    return out;
}

// Fragment shader

@fragment
fn fs_main(in: VertexOutput) -> @location(0) vec4<u32> {
    return vec4<u32>( in.color.xyz ,255);
}
There are two shaders involved in this process. The first shader is the normal rendering shader, which we will skip. The second shader is used for color-coded rendering, which is actually simpler. Color codes are passed in via vertex attributes and then to the fragment shader, which renders these colors. The transparency channel is set to fully opaque, and the output format is u32 to avoid scaling color values to floating-point numbers, which could alter the color codes.
bufferWidth = (Math.floor(2 * 4 / 256.0) + 1) * 256;
copiedBuffer = createGPUBuffer(device, new Uint8Array(bufferWidth * 2), GPUBufferUsage.COPY_DST | GPUBufferUsage.MAP_READ);
async function pick(x, y) {
    if (inRendering) {
        return 17;
    }
    inRendering = true;
passEncoder = commandEncoder.beginRenderPass(renderPassDescColorCode);

passEncoder.setViewport(0, 0, canvas.width, canvas.height, 0, 1);
teapot.encodeForColorCoding(passEncoder);

passEncoder.end();
commandEncoder.copyTextureToBuffer({ texture: colorCodeTexture, origin: { x, y } }, { buffer: copiedBuffer, bytesPerRow: bufferWidth }, { width: 2, height: 2 });
device.queue.submit([commandEncoder.finish()]);

await device.queue.onSubmittedWorkDone();
        await copiedBuffer.mapAsync(GPUMapMode.READ, 0, bufferWidth * 2);
        //const imageData = new ImageData(new Uint8ClampedArray(copiedBuffer.getMappedRange()), bufferWidth / 4, 2);

        const d = new Uint8ClampedArray(copiedBuffer.getMappedRange());
        const picked = d[0];
        console.log('pick ', picked);

        copiedBuffer.unmap();
        inRendering = false;

        return picked;
    }

    return 17;
}
Firstly, to prevent the pick function from being called while a previous call is still processing, we use a flag inRendering. This ensures that temporary buffers are not written to while being mapped, avoiding potential issues.
After rendering, we copy the framebuffer to a temporary copiedBuffer. This buffer is smaller than the framebuffer, and we only copy a 2x2 window around the current mouse cursor. Note that the bytesPerRow parameter must be a multiple of 256, according to the specification, so we allocate more space than necessary to comply with this requirement.
Once the command queue is completed, we map the copied buffer for read access. While a more sophisticated implementation might analyze the most dominant color to determine the most likely object, this example simply checks the red channel of the first pixel. Given that there are only 16 objects in the demo, the red channel alone suffices to identify the object index, so this approach is used for simplicity.
Let's now examine the pipeline setup code, specifically how we encode object indices into colors when setting up teapot instances. We encode the object index into RGB values using little-endian format.
for (let i = 0; i < this.instanceCount; ++i) {
    colorCodes.set([i & 0b11111111,
    (i >> 8) & 0b11111111, (i >> 16) & 0b11111111, (i >> 24) & 0b11111111], i * 4 + 0);
}
The final step is creating the target texture for rendering the color-coded scene:
const colorCodeTextureDesc = {
    size: [canvas.width, canvas.height, 1],
    dimension: '2d',
    format: 'rgba8uint',
    usage: GPUTextureUsage.RENDER_ATTACHMENT | GPUTextureUsage.TEXTURE_BINDING | GPUTextureUsage.COPY_SRC
};

colorCodeTexture = device.createTexture(colorCodeTextureDesc);

let colorCodeTextureView = colorCodeTexture.createView();

colorCodeAttachment = {
    view: colorCodeTextureView,
    clearValue: { r: 1, g: 0, b: 0, a: 1 },
    loadOp: 'clear',
    storeOp: 'store'
};
We use the rgba8unorm format for the texture to match the shader's output format. For the read-back buffer, note how we determine bufferWidth. Although a single row of a 2x2 window requires only 4 * 2 bytes, it must be rounded up to the nearest multiple of 256. This is a requirement for GPUImageCopyBuffer.
This concludes the picking setup. The normal rendering part, which we have chosen to omit, complements this process.