2.6 Implementing Fake 3D
In this example[1], we'll explore a technique for creating a convincing fake 3D effect. In a genuine 3D scene, moving the camera position within the screen plane produces a phenomenon known as parallax. This effect occurs because distant objects appear to move more slowly than those in the foreground.
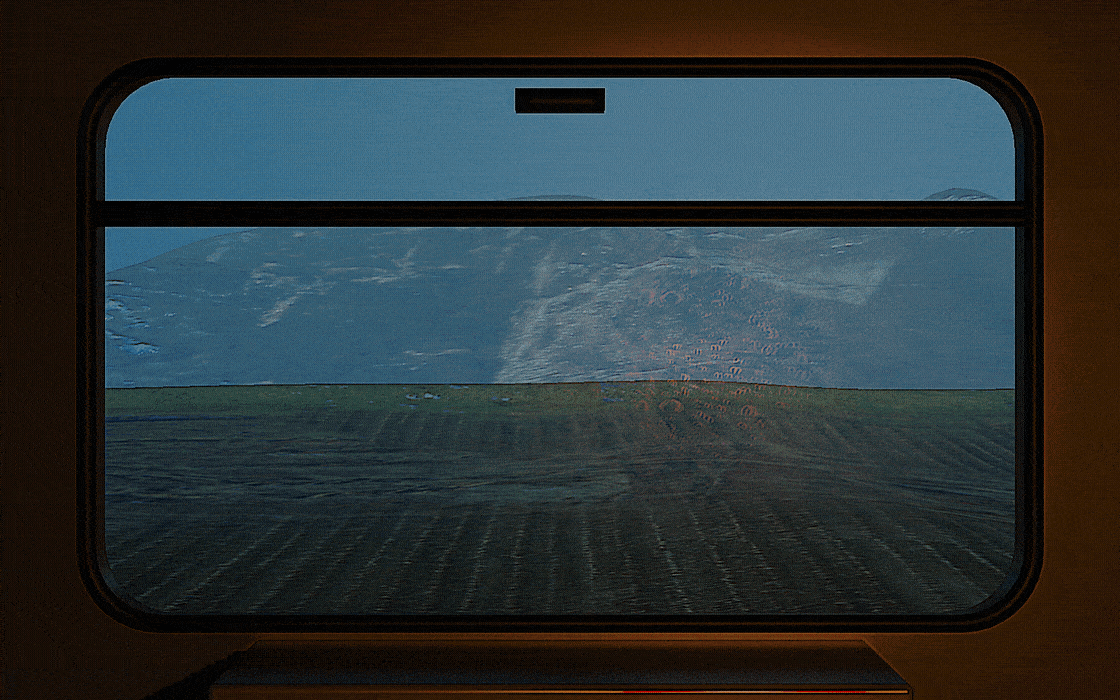
We can simulate this parallax effect on a 2D image by utilizing a corresponding depth map, resulting in a compelling 3D illusion. The concept is straightforward: we adjust the texture coordinates based on a movement offset. The magnitude of this adjustment is determined by both the movement and the depth map, ensuring that pixels representing distant objects are offset less than those representing nearby objects.
To generate a depth map for your image, consider using the MiDaS model. For detailed instructions on creating a depth map, please consult the provided link. In this example, we'll work with a sample image and its paired depth map.
To enhance our demonstration, we'll implement mouse control for the movement vector. This vector is calculated by subtracting the current mouse position from the canvas center. As a result, the further the mouse moves from the image's center, the more the image will be offset in the opposite direction, creating a dynamic and interactive experience.
canvas.addEventListener('mousemove', function (event) {
    let mousePos = getMousePos(canvas, event);
    mousePos = { x: mousePos.x * 2.0 / canvas.width - 1.0, y: mousePos.y * 2.0 / canvas.height - 1.0 };
    //console.log('mousemove', mousePos);
    requestAnimationFrame(() => {
        render([mousePos.x * 0.01, mousePos.y* 0.01]);
    });
});
The magic happens in the fragment shader:
@group(0) @binding(0)
var t_diffuse: texture_2d<f32>;
@group(0) @binding(1)
var t_depth: texture_2d<f32>;
@group(0) @binding(2)
var s_diffuse: sampler;
@group(0) @binding(3)
var<uniform> offset: vec2<f32>;

@fragment
fn fs_main(in: VertexOutput) -> @location(0) vec4<f32> {
    var depth:vec4<f32> = textureSampleLevel(t_depth, s_diffuse, in.tex_coords, 0);
    var color:vec4<f32> = textureSampleLevel(t_diffuse, s_diffuse, in.tex_coords - offset * depth.r, 0);

    return color;
}
In the shader, we perform two texture sampling operations. The first samples the depth map to obtain the depth value for each pixel. The second samples the actual image, but with adjusted texture coordinates. This adjustment is calculated by scaling the mouse offset by the depth value, creating the illusion of depth and movement.
Despite its simplicity, this program yields remarkably engaging results. We encourage you to experiment with the demonstration and try substituting the provided image with your own to see how the effect translates to different scenes and subjects.
Launch Playground - 2_06_fake_3d| [1]: | This tutorial is inspired by this WebGL tutorial. |