2.0 Rendering to Textures
In this chapter, we will explore 2D techniques. You might wonder why we're focusing on 2D using a 3D API. As it turns out, WebGPU is also highly effective for accelerating 2D processing. Applications include image and video processing, user interfaces, and more. Therefore, we aim to cover some fundamental 2D-related topics.
Launch Playground - 2_00_render_to_texturesIn this tutorial, we'll discuss the "render to texture" technique, a concept you may find similarity from our previous discussion on mipmaps. This technique involves two rendering passes. In the first pass, we use a texture map as the render target, and render a 3D scene onto that texture map. In the second pass, we render again using that texture map. This approach is useful in creating mirrors or dynamic reflections in 3D scenes, among other applications.
Now, let's examine the code. In this example, we'll work with two shaders: the teapot_shader and the box_shader. Our objective is to render a rotating teapot onto a texture map during the first pass, then apply that texture to a cube in the second rendering pass.
We'll organize these objects into two separate classes: Teapot and Box. You've encountered these classes in previous examples. For simplicity, we'll render only the teapot's normals instead of applying full Phong shading.
const teapotTextureSize = 512;

const depthTextureForTeapotDesc = {
    size: [teapotTextureSize, teapotTextureSize, 1],
    dimension: '2d',
    format: 'depth24plus-stencil8',
    usage: GPUTextureUsage.RENDER_ATTACHMENT
};

let depthTextureForTeapot = device.createTexture(depthTextureForTeapotDesc);
let depthTextureViewForTeapot = depthTextureForTeapot.createView();

const depthAttachmentForTeapot = {
    view: depthTextureViewForTeapot,
    depthClearValue: 1,
    depthLoadOp: 'clear',
    depthStoreOp: 'store',
    stencilClearValue: 0,
    stencilLoadOp: 'clear',
    stencilStoreOp: 'store'
};
const colorTextureForTeapotDesc = {
    size: [teapotTextureSize, teapotTextureSize, 1],
    dimension: '2d',
    format: 'bgra8unorm',
    usage: GPUTextureUsage.RENDER_ATTACHMENT | GPUTextureUsage.TEXTURE_BINDING
};
let colorTextureForTeapot = device.createTexture(colorTextureForTeapotDesc);
To set up the pipeline, we begin by creating a teapot texture with dimensions of 512x512 pixels, along with a depth map to handle occlusion. For rendering purposes, this target texture map must support both RENDER_ATTACHMENT and TEXTURE_BINDING usage flags.
Next, we establish the first render pass utilizing these two textures:
let colorTextureForTeapotView = colorTextureForTeapot.createView();
let colorForTeapotAttachment = {
    view: colorTextureForTeapotView,
    clearValue: { r: 0, g: 1, b: 0, a: 1 },
    loadOp: 'clear',
    storeOp: 'store'
};

const renderPassForTeapotDesc = {
    colorAttachments: [colorForTeapotAttachment],
    depthStencilAttachment: depthAttachmentForTeapot
};
For the second render pass, we will configure it as before, using the canvas as the render target.
const depthTextureDesc = {
    size: [canvas.width, canvas.height, 1],
    dimension: '2d',
    format: 'depth24plus-stencil8',
    usage: GPUTextureUsage.RENDER_ATTACHMENT
};

let depthTexture = device.createTexture(depthTextureDesc);
let depthTextureView = depthTexture.createView();

const depthAttachment = {
    view: depthTextureView,
    depthClearValue: 1,
    depthLoadOp: 'clear',
    depthStoreOp: 'store',
    stencilClearValue: 0,
    stencilLoadOp: 'clear',
    stencilStoreOp: 'store'
};
let colorTexture = context.getCurrentTexture();
let colorTextureView = colorTexture.createView();

let colorAttachment = {
    view: colorTextureView,
    clearValue: { r: 1, g: 0, b: 0, a: 1 },
    loadOp: 'clear',
    storeOp: 'store'
};

const renderPassDesc = {
    colorAttachments: [colorAttachment],
    depthStencilAttachment: depthAttachment
};
The rotation of the teapot occurs during rendering; we simply rotate the camera's position around the z-axis. Until now, we haven't discussed how to update uniforms. In previous tutorials, our uniforms were created once at the program's beginning, and their values remained constant. However, to rotate the camera, we need to continuously update the modelview matrix and the derived normal matrix.
angle += 0.01;
let modelViewMatrix = glMatrix.mat4.lookAt(glMatrix.mat4.create(),
    glMatrix.vec3.fromValues(Math.cos(angle) * 15.0, Math.sin(angle) * 15.0, 15), glMatrix.vec3.fromValues(0, 0, 0), glMatrix.vec3.fromValues(0.0, 0.0, 1.0));

let modelViewMatrixUniformBufferUpdate = createGPUBuffer(device, modelViewMatrix, GPUBufferUsage.COPY_SRC);

let modelViewMatrixInverse = glMatrix.mat4.invert(glMatrix.mat4.create(), modelViewMatrix);

let normalMatrix = glMatrix.mat4.transpose(glMatrix.mat4.create(), modelViewMatrixInverse);

let normalMatrixUniformBufferUpdate = createGPUBuffer(device, normalMatrix, GPUBufferUsage.COPY_SRC);
commandEncoder.copyBufferToBuffer(modelViewMatrixUniformBufferUpdate, 0,
    modelViewMatrixUniformBuffer, 0, modelViewMatrix.byteLength);
commandEncoder.copyBufferToBuffer(normalMatrixUniformBufferUpdate, 0,
    normalMatrixUniformBuffer, 0, normalMatrix.byteLength);
await device.queue.onSubmittedWorkDone();

modelViewMatrixUniformBufferUpdate.destroy();
normalMatrixUniformBufferUpdate.destroy();
The code snippet above demonstrates how the uniform buffer is updated. For each frame, we create two staging buffers with the updated content: one for the modelview matrix and another for the normal matrix. Note that we request the COPY_SRC usage, as we will copy the updated data from these buffers. For the actual uniform buffers, we need to request both UNIFORM and COPY_DST usages, as they are the destinations of the data copy.
At the beginning of draw command formation, we call the function copyBufferToBuffer to perform the data copy. Other draw commands follow, ensuring that the uniforms are updated before drawing.
It's crucial to call buffer.destroy() to release the staging buffers. However, make sure they are destroyed after calling onSubmittedWorkDone. This function serves as a synchronization mechanism to ensure that rendering is complete with both buffers before we release them.
let passEncoder = commandEncoder.beginRenderPass(renderPassForTeapotDesc);
passEncoder.setViewport(0, 0, teapotTextureSize, teapotTextureSize, 0, 1);
teapot.encode(passEncoder);
passEncoder.end();

passEncoder = commandEncoder.beginRenderPass(renderPassDesc);
passEncoder.setViewport(0, 0, canvas.width, canvas.height, 0, 1);
box.encode(passEncoder);
passEncoder.end();

device.queue.submit([commandEncoder.finish()]);
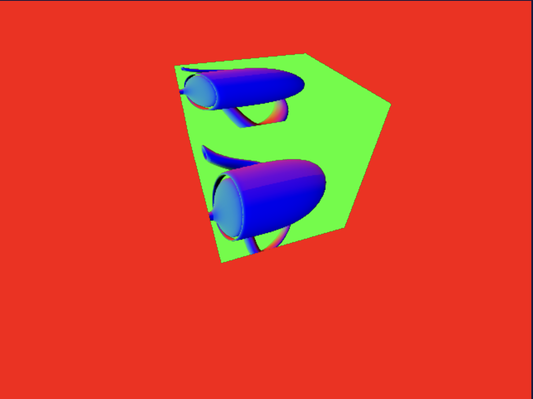
Here is the two-pass rendering code, which forms one submission. The second pass will run after the first pass is complete. By that time, the texture map will be updated with the rotated teapot. During the second pass, we apply the teapot texture to the cube.