1.17 Multi-Sample Anti-Aliasing (MSAA)
We perceive the world through sampling. For example, our eyes sample at a frame rate between 30 to 60 Hz. Insufficient sampling rates can result in unpleasant artifacts. In computer graphics, managing sampling limits is a constant challenge.
Launch Playground - 1_17_msaaA typical problem relates to image resolution, particularly during rasterization. We've previously likened this process to laying bricks (pixels) to cover a triangle's area. When zooming in on a triangle's edge, the situation can be illustrated as follows:
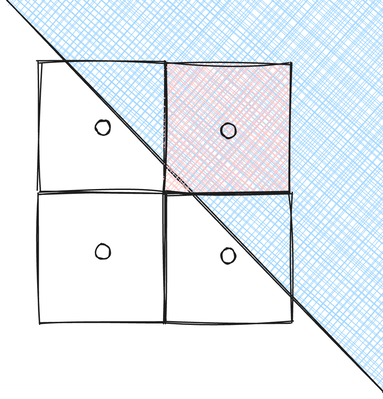
During rasterization, we need a heuristic to determine if a pixel is inside or outside a triangle. A simple approach is to check the pixel's center. In the example above, only one pixel's center falls completely inside the triangle. For the two pixels crossing the edge, despite having large overlapping areas with the triangle, their centers are outside, so they're considered entirely outside. A more reasonable coloring strategy for these pixels might involve mixing the triangle's color with the background color based on the overlap ratio.
This type of artifact is called aliasing, and it becomes more noticeable at lower output resolutions. Insufficient sampling rates can also cause other strange artifacts. For instance, in our example, although a pixel is modeled as a square, its color is determined solely by its center. If we have a structure smaller than a pixel, the entire pixel will be colored based on what the center point samples from that small structure. A more reasonable approach would be to average the colors of the small structure.
Fortunately, there are ways to improve sampling quality without physically upgrading your monitor. We use a set of algorithms collectively known as anti-aliasing to address this issue. For example, anti-aliasing is commonly applied to text rendering to enhance quality, even when each glyph is quite small and has limited resolution.
In this tutorial, we'll introduce the fundamental anti-aliasing method known as multi-sample anti-aliasing (MSAA). The concept behind MSAA is straightforward: we first render the result with four samples for each pixel. Afterward, we downscale the image to the desired size by averaging these four samples per pixel. This averaging implements our strategy of creating a mixed color based on the overlapping area of the background and the triangle. It avoids expensive calculations of the actual overlap ratio by simply examining more samples.
MSAA is a built-in feature of the WebGPU API, making its implementation as simple as adding some extra configurations. Let's explore how to achieve this.
First, we create a multi-sampled texture:
const msaaTexture = device.createTexture({
    size: [canvas.width, canvas.height],
    sampleCount: 4,
    format: navigator.gpu.getPreferredCanvasFormat(),
    usage: GPUTextureUsage.RENDER_ATTACHMENT,
});
We also need to update our depth texture to support multi-sampling:
const depthTextureDesc = {
    size: [canvas.width, canvas.height, 1],
    sampleCount: 4,
    dimension: '2d',
    format: 'depth24plus-stencil8',
    usage: GPUTextureUsage.RENDER_ATTACHMENT
};
In both cases, we introduce a new sampleCount property and set it to 4, indicating that we want four samples per pixel. The format and usage properties remain the same as in non-MSAA configurations.
It's worth noting that we don't need to modify our shaders for MSAA, as it operates transparently to them. The primary changes occur when we define the render target.
Next, we update our color attachment configuration:
let colorAttachment = {
    view: view,
    resolveTarget: colorTextureView,
    clearValue: { r: 1, g: 0, b: 0, a: 1 },
    loadOp: 'clear',
    storeOp: 'store'
};
In this configuration, we specify two render targets:
The view property now points to our multi-sampled texture (msaaTexture.createView()).
We introduce a new resolveTarget property, which points to the actual canvas texture view (colorTextureView). This is where the final, resolved output will be stored.
The rendering process now occurs in two stages:
The scene is first rendered to the multi-sampled texture (msaaTexture).
The result is then automatically resolved (averaged) and output to the resolveTarget.
This two-stage process happens transparently, requiring no additional code beyond the configuration changes we've made.
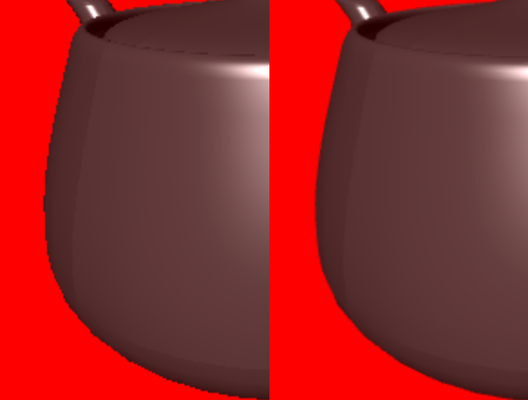
To illustrate the effectiveness of MSAA, we can compare zoomed-in views of a rendered scene before and after enabling MSAA. The difference should be noticeable, with smoother edges and reduced aliasing artifacts in the MSAA-enabled version.